Your shopping cart is currently empty.
How to use the Product Visualiser
Our custom design option allows you to take full control of your product graphic design. This software is best used on a tablet, laptop or desktop computer rather than a mobile phone.
Whilst most of the controls in the visualiser are self-explanatory, please heed the following guidance to get the best experience from using the system.
To start a design, choose a custom product option then click on the 'Customise & Buy' button. The customiser will then open - in this example we're looking at the custom design Aero tri-pak:
If you can't see the sign template when you start, you may need to refesh your browser.
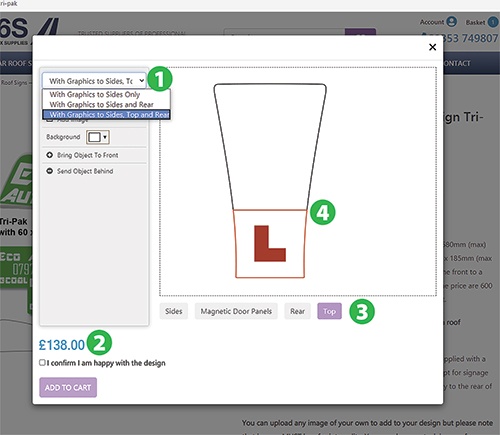
1 Use the drop down menu to select front, side and rear graphics as required.
2 Note that the price will change according to the level of signage required - it costs less to have graphics to the sides only than to have graphics to the sides, rear and/or front.
3 Use the buttons beneath the main image to toggle between the different sign faces and door panels.
4 Note that any area of the main image outlined in red can't be edited by you. These areas are preserved for the regulation sized red L that we supply with the signs*.
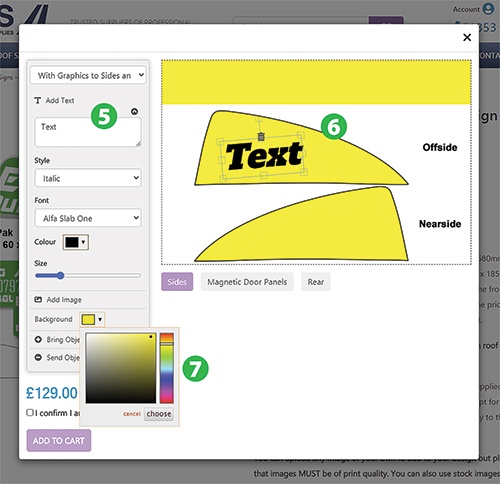 5 Use the drop down menu to select form a range of fonts and styles.
6 A text box with grab handles will appear in your image. Click on it to make the font appear correctly. Use the grab handles to move, scale or rotate the text you've added. You can also use the slider to adjust font size.
7 The background colour can be altered using the selection tool. Generally we expect sides and door panels to be the same colour but switching between sign faces and panels it may not be easy for you to exactly match a chosen colour - nothing to worry about - we'll set the background colour evenly for all frames when we receive your order unless you contact us to tell us differently.
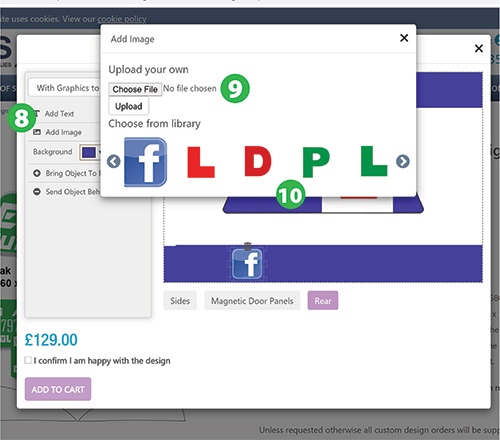 8 Click on the 'Add Image' button to open up the image upload manager.
9 You can upload any and as many of your own images to add to your design but please note that images MUST be of print quality. We recommend a resolution of 300 ppi. Files should be of about the size required for print. See below for more detail about image upload.
10 You can also use stock images from within the visualiser. Note that the L and D plates that should appear when you first open the upload manager are of regulation size with appropriate white space. You will need these for Aero/Delta/Curver/Rover signs where there is no fixed L-plate position.* You Must Not scale the L or D plate unless you intend to use other regulation size plates on your vehicle. If you alter the size, we will assume that you understand the legal implications of doing so.
The library contains a number of social media and ADI emblems that we are commonly asked to use in signage. There are also some colour blocks that you can use to build layered images, shadow effects etc. If you are happy to share other logos that you think might be useful you can send them to us by email with a request to add to library.
TO REPEAT A DESIGN
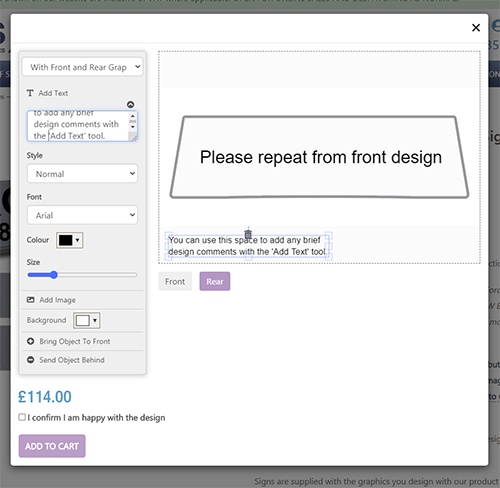 If you have spent time drafting the front of your sign (or one of the door panels in a Tri-pak) and want the same on the opposite side you don't need to redraw it.
Just type a short message using the 'add text' tool e.g.
'Repeat from front side'
'Match Colours from Rear'
etc.
Image file types and limits
Image type for the upload manager can be .gif, .png or .jpg. You will find it particularly useful to upload .png files with transparent backgrounds if you want to layer images or overlay text using a font not available on the visualiser.
The maximum file size we recommend is 1.0Gb. The visualiser will generate a low resolution 1/5 scale thumbnail of any images that you select to upload from your own device . This appears within the visualiser templates so that you can create your design. The image manager will only upload your full size high resolution images when you finalise the design and pay for your order.
The visualiser will not allow you to save your design to your device although your design selections will remain on your device so long as you keep the browser window open. Screen shots of the visualiser will not be of print quality but you can use them to experiment with a design that you then ask us to produce from a Graphic Advantage purchase.
Only G6S will receive images of your final design when you complete your order at checkout.
If you want to save on design cost by using the visualiser but can't achieve the effect you want, you can always download the sign templates here in PDF form and work on your design using software that you are familiar with. Save your work on individual panels as bitmap (.png, .jpg) at a minimum 300 ppi at full size and you can then upload them to the visualiser to purchase.
Once you are happy with your design click the box marked 'Please check and send proof'
We will send a proof for approval before we print your signage. Your order will not proceed until we have confirmation that you are happy with the proof and any amendments. Note that if you cancel an order after a proof has been prepared, an artwork charge will be deducted from any refund in accordance with our terms and conditions.
Remember that colours in your proof may not look identical when seen on different screens and may not exactly match CMYK printed output.
*Please email us if want a sign with fixed L position but prefer a D-plate, R-plate, N-plate or other symbol in place of the regulation L.