Your shopping cart is currently empty.
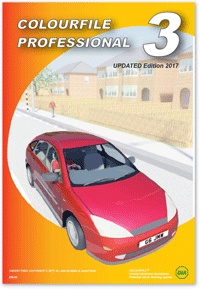
Colourfile Professional 3 - Guidance for Users
Thank you for considering purchasing the 3rd edition of Colourfile Professional. Since the Colourfile® range of teaching tools first appeared in 1990 the driving test has seen many changes and continues to evolve. The training of instructors has also evolved to keep up with the needs of the profession and the clients it serves. The ADI is no longer expected to teach only to L-test standard; indeed to remain competitive the instructor must be able to give remedial or advanced tuition to qualified drivers and needs the tools to do so. With this new edition instructors can equip themselves with a modern training aid designed to serve them well into the future. 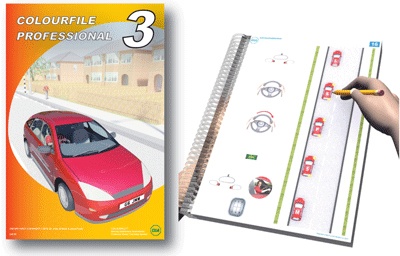
It remains a fact that three quarters of your pupils' knowledge is gained from visual stimuli and quite naturally the DIA and the Driver & Vehicle Standards Agency (DVSA) recommend full use of visual teaching aids. The high visual impact of this product is designed to attract your learners’ attention, stimulate interest and save teaching time. Colourfile Professional promotes a structured approach to teaching by means of specified learning outcomes, making it the preferred resource for driving instructor trainers.
This training aid will help trainee and qualified instructors to select the relevant information for their lessons without reference to copious notes. Correct and effective use of Colourfile Professional in a part 3 instructional ability test or check test will demonstrate candidates’ awareness of the need for a structured approach to teaching.
The guidance notes that follow were written to help you use the visuals correctly. Remember that there is no single style of presentation or routine briefing for each subject that is suitable for all ADIs or for every learner, nor is this desirable. Learners differ both in ability and responsiveness to teaching content and style. The good ADI will vary his or her lesson delivery with these factors in mind. It is important therefore to adapt your use of this resource to the needs of your pupil's ability, aptitude and attitude so that lesson objectives may be achieved.
Colourfile Professional is designed to aid the instructor with lessons given to a 'beginner', right through to a pupil approaching 'test standard' and beyond, providing premade driving instructor lesson plans. With a few obvious exceptions, the arrangement of the lesson plans within this resource is not intended to impose a strict order in which lessons should be given. This will depend on your pupils' needs, ability and confidence, and your particular location and circumstances.
Colourfile Professional contains encapsulated colour diagrams and associated lesson plans. Where possible, the diagrams are laid out so that learning outcomes can be covered by the diagrams on the facing page. For some subjects this is impractical and you will find that the lesson can be better covered by reference to consecutive pages.
This product contains images from a virtual 3D environment. Mirrors give true reflections from within that environment. With virtual head lights and a camera in the head of our virtual driver, the images taken from the driver’s seat show exactly what a driver would see!
Using the Lesson Plans: The best method for lesson planning is to set behavioural objectives, which allow the teacher to measure progress by an observed change in the learner's level of skill. The following key features of a lesson plan form an integral part of this book. The meaning of the terms and context in which they are used in the lesson plans is explained below. 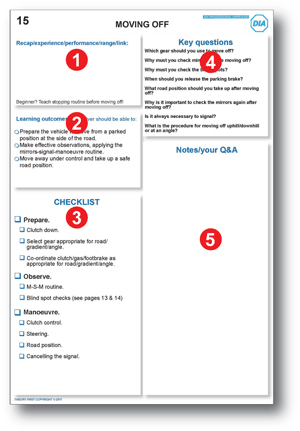
Box 1 Recap: ‘recapitulation’ is a verbal summary of what was previously learned. It is best practice to remind the driver of what was achieved in the previous lesson, or, if a new client, find out about his/her background and previous experience by means of Q&A so that you can decide on the level at which instruction should commence.
Experience: this is self-explanatory. What relevant practice or tuition has the driver previously had in the subject being taught.
Performance: if the driver has previously had tuition in the subject you need to know the level of skill and understanding achieved in order to consolidate and progress the learning process.
Range: the conditions under which learning outcomes (objectives) for the current lesson should be achieved. E.g. when teaching ‘moving off under control’ the range for a novice might include ‘move off straight ahead on a level road’. With experience the range might change to include ‘move off uphill at an angle’.
Link: relating what is already known or experienced to what will be taught in the current lesson.
Box 2: Learning outcomes: or ‘lesson objectives’ are specific statements of what the driver should be able to achieve at the end of your lesson. The driving instructor lesson plans in Colourfile Professional show a number of possible learning outcomes that could be achieved with the help of diagrams. Other learning outcomes for which use of diagrams may not be appropriate but which should be achieved within the subject area are also listed. Select those you need to set your current lesson objectives.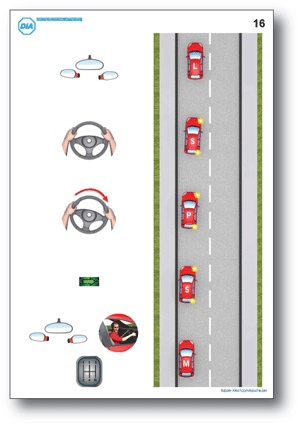
Box 3: Checklist: key learning points for the diagrams on the facing page. You may wish to mark those relevant to your current lesson with a dry wipe pen, and tick them off as they are dealt with.
Box 4: Key questions: the pupil should be able to answer these if the objectives have been met. You should select and/or rephrase the questions according to the ‘range’ of your lesson. Rephrasing does not matter providing that the questions you use are structured to aid the learning process.
Box 5: This box is blank for you to add your own notes or questions with a dry-wipe or permanent marker. You may want to print these on self-adhesive labels.You could also use this box to cross-reference your lesson to other pages such as the workstations.
Diagrams are presented in ‘birds-eye’ or plan view as appropriate for the lesson. In addition you will find a section containing workstations; these are blank road layouts taken in plan view from the main training diagrams. You can use these and/or the ‘note pad’ to create your own scenarios with a dry wipe pen.
This book is a self- development tool. Without exception, the training diagrams are free of instructional text. This is because text on a diagram distracts both teacher and learner! Whilst you should heed the prompts given in the lesson plans it is not our intention to direct you in what to say or how to say it. You are encouraged to develop your own professional skills by using this product. 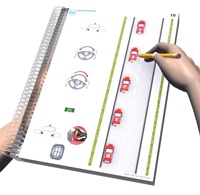
In the Car: Colourfile Professional has been designed without instructional text on the diagram pages. This is to prevent your pupil becoming distracted by attempting to read ahead of you. Place the training aid on your knee or clipboard so that the pupil can see the diagram without sight of the lesson plan. When you are familiar with the training aid you should be able to keep the lesson plan page covered/folded back with minimal reference to it. Try not to cover the diagrams you are referring to with your arm or hand. It is better to use a pointer (a pen or pencil for example). Another useful tip is to turn the page round on occasions to present the information from another road user's point of view or so that the approach to a junction appears the same as the driver's view ahead.
VISUAL BRIEFING GUIDELINES
Once you’ve given a recap and agreed the target learning outcomes with your client it is time to commence your briefing.
The briefing is your explanation of how the learner should achieve the set objectives. You must cover the topic by tailoring your instruction to the learner. In the early stages of learning you may need to give a full briefing containing step by step instructions. As the learner's skill and knowledge increase you should be able to reduce the amount of verbal explanation required. As the learner approaches driving test standard you may only need to use a question and answer session to brush up on previously learned material, or encourage the learner to apply what is known to a new scenario.
Respond to your learner’s needs: it is not always necessary to use a diagram to teach some driving tasks. Key learning points may be dealt with by a coaching or Q&A session. However, if as a result of such diagnostic questions you identify a weakness in your learner's knowledge, it might then be appropriate to refer back to a diagram.
With the above in mind, it should be obvious that you will rely most heavily on your Colourfile in the earlier stages of learning to drive. ‘Dip in’ to the Colourfile when teaching new subjects or driving procedures to more experienced drivers, giving remedial tuition to qualified drivers or giving advanced tuition.
Workstations: These are blank road layouts included in your Colourfile and may be used in several ways: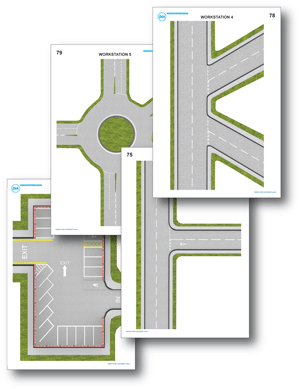
1) It is often useful in the early stages of learning to illustrate what the pupil did wrong on approach to a junction or other hazard (for example, being too close to the left and clipping the kerb on a left turn).
2) You may want to illustrate a particular set of circumstances which may have led to your pupil making an error, or which requires further explanation. You should make sure that your drawings are at an appropriate scale for the road layout you are using.
3) You may want to use the workstations independently of the prepared diagrams. This may be particularly useful during a recap session, or when your pupil is approaching test standard and is 'brushing up' on how to deal with particular hazards. However, it is not possible to provide diagrams that suit every circumstance and you might find it necessary to draw particular road layouts on the 'white board’ or ‘notepad’ provided.
USING DRY WIPE PENS
The pages are encapsulated so that you may use a dry wipe pen to draw on or annotate the diagrams when in use. Before you do this it is a good idea to check that the pen you are using is compatible with the plastic encapsulation. Test this on a blank area such as the inside of the cover. We recommend the STAEDTLER® lumocolor non- permanent brand. It is helpful to keep a selection of these in the training vehicle. Periodically you should clean the encapsulated diagrams with a slightly damp cloth.
Colourfile Professional 3 - 2017 UPDATE
In response to exceptional customer demand we released a revised edition of Colourfile Professional 3 in October 2017, two months in advance of changes to the UK driving test.
The revised edition contains the following new and/or revised pages:
- Bay Parking - revised images to include 'Drive in - Reverse Out
- Parking against the Traffic Flow (Parking on the Right) and reversing before moving off.
- Independent Driving - with support material for urban and extra-urban journey planning and management and 'getting there by use of SAT-NAV or route signs. We've also included material supporting a lesson on vehicle familiarisation which the trainer might use to ask 'When safe, 'Show Me' how you would...'
Although these new pages will clearly help those looking for material to help learners prepare for the driving test, in line with our policy of 'not teaching just for test' we've included extra information and provided 'food for thought' so the trainer can make the most of this opportunity to develop and extend their teaching range. In common with previous editions the new material comes with lesson checklist and key questions to the left page so the trainer can develop his or her own style when agreeing the lesson plan with their learner.
So what have we added?
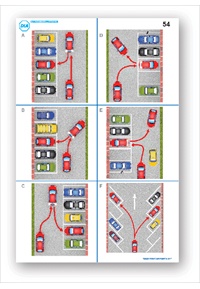 Bay Parking: Of course, trainers, as expert drivers will usually advocate reversing in and driving out of parking bays. Being pragmatic, however, we have to accept the supermarket car park scenario where drivers inevitably drive into a space and then reverse out and should teach how to do this correctly for road user safety.
We recommend that trainers adopt a realistic approach to this exercise rather than offering a 'prescriptive method'. The authors would challenge any trainer to achieve the manoeuvres under the constraints suggested in some materials we've seen to date! Reality is that in a restricted space the driver faced with oncoming traffic and a gap between two other vehicles will not be able to drive in forwards in a smooth curve! Colourfile prompts you to train your learner to cope with reality!
Again, in line with our policy of not teaching for test, we've included a diagram of an 'angled bay park', usually, though not exclusively, reserved for car parks with a one way system in operation. What is the advantage of angled bays?...
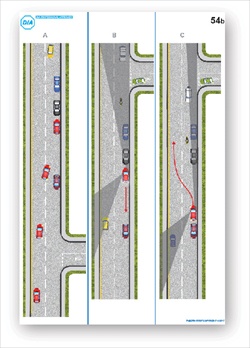
Parking on the Right: Scene; outside Hartlepool Driving Test Centre, 1979, candidate a 17-year-old John M Wells in the last minute of his driving test with an examiner imported to reduce waiting times and unfamiliar with the town! This was the first time that I was asked to park on the right. To be fair, the examiner asked me to 'park where convenient' and on the right was it! To avoid unnecessary suspense I will tell you now that the candidate did pass first time.
Look carefully at the video released by DVSA on this subject and you will see why the reversing element is included. It really is common sense that you may need to reverse to minimise blind spots before moving off from the right. Interestingly, just 5 minutes before we received the DVSA blog article on this subject, we'd sent this diagram to the Driving Instructors Association (DIA) for their approval.
 Independent driving: It is a problem with any practical driving assessment that instructions or directions given by the assessor or examiner inevitably provoke a response from the candidate.
So, “Take the next road on the left please” = “Check your mirrors and signal!”
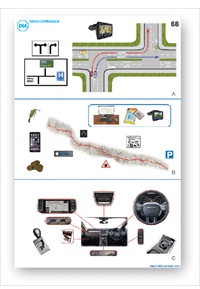
Since 2010 the UK driving test has included an assessment of ‘unprompted driving’ in which candidates are asked to follow a set route. From December 2017 the independent driving element of the test was extended and candidates are expected follow directions using a SAT-NAV device or by following local signs to a stated destination. This subject is easy to teach and should be practiced regularly as the driver approaches driving test standard. To help you Colourfile has numerous road layouts and images of road signs and markings to assist with teaching independent driving. We have also revised the lesson plan and supporting diagrams on independent driving in this updated edition of Colourfile 3. We suggest you use the material as follows: Diagram A introduces the concept of following directions (route sign or SAT-NAV) that can be practiced over several lessons so that confidence is gained to drive alone through unfamiliar areas in towns. Diagram B relates these skills to planning and management of longer journeys. Use Diagram C to emphasise the importance of vehicle familiarisation which could easily be tested by asking a driver ‘When it is safe to do so, show me how you would operate the...’
Modern vehicles increasingly rely on electronics that supplement driving ability and are designed to improve safety. Drivers need to know how these devices and systems work if they are to be used safely and vehicle warnings understood. Will your new driver be prepared the first time they are given a loan car/hire an unfamiliar vehicle/drive an automatic?